Wire Batteries in Series, Parallel or Both: Diagrams and Rules
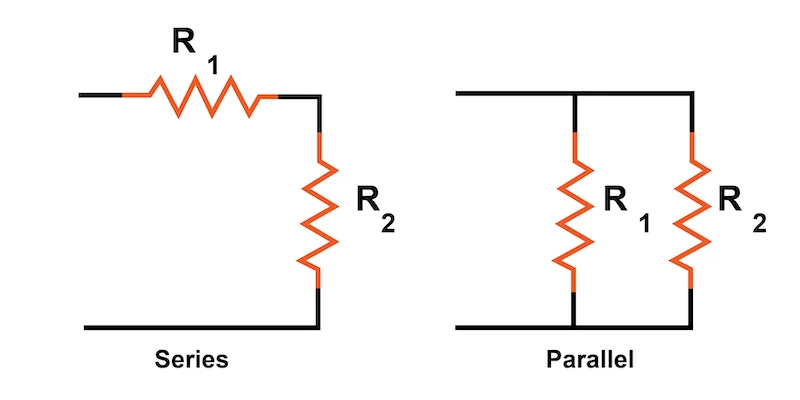
A parallel circuit connects components side-by-side while a series circuit connects them end-to-end. Understanding the difference between a circuit in series and parallel is essential for building battery banks, solar systems and electrical projects.
In a parallel circuit, voltage stays the same but capacity adds up. In a series circuit, voltage adds up but capacity stays the same. This guide covers electrical series and parallel configurations with step-by-step wiring diagrams for batteries. For charging these battery banks, see our guides on 24V chargers, 48V chargers and marine battery chargers.
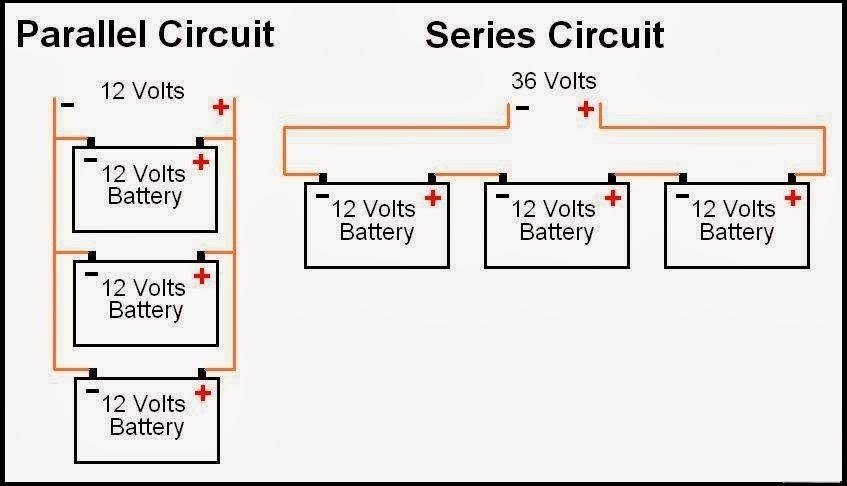
Series and Parallel Circuit Diagram Overview
This parallel series circuit diagram shows the key difference between wiring configurations. Use this diagram of series connection and parallel connection as a reference for your battery bank projects.
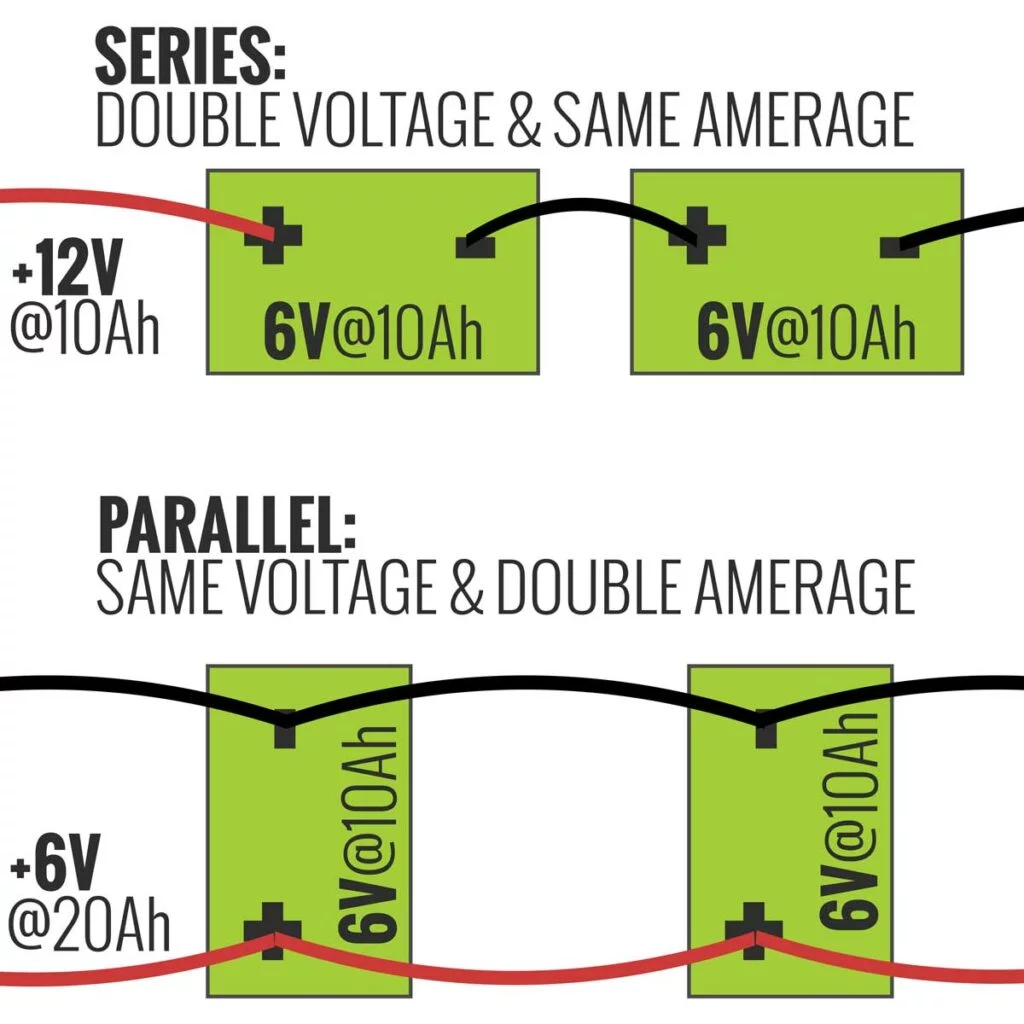
Parallel vs Series: What’s the Difference?
The core difference between parallel and series circuits comes down to how current flows:
- Series circuit: Current flows through one path only. All components share the same current. Voltage divides across components.
- Parallel circuit: Current splits into multiple paths. Voltage stays the same across all components. Current capacity adds up.
This parallel circuit series circuit distinction matters for batteries because it determines whether you’re increasing voltage or capacity.
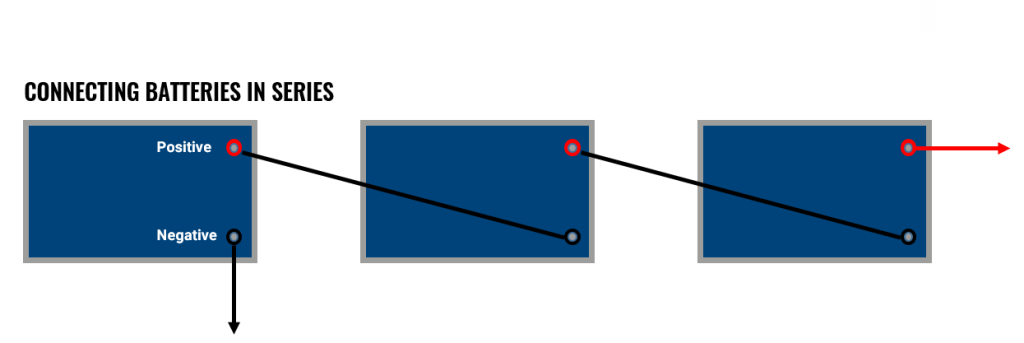
Series Circuit Battery Connection (Voltage Up, Capacity Same)
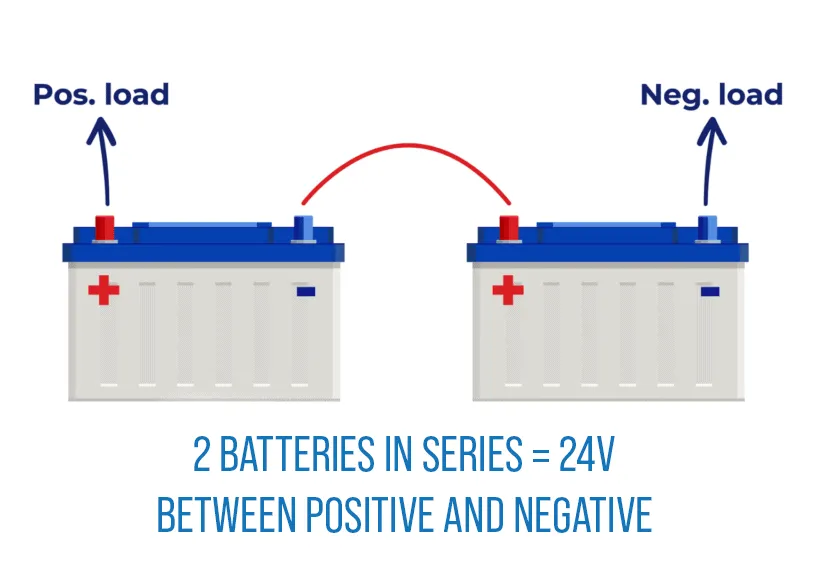
Connecting batteries in a series circuit increases total voltage while amp-hour capacity stays the same. You’re linking batteries end-to-end in a single path.
- How: Connect the positive (+) terminal of one battery to the negative (-) terminal of the next
- Result: Total voltage increases (sum of individual voltages); amp-hour (Ah) capacity stays the same as one battery
- Example: Two 12V, 100Ah batteries in series make a 24V, 100Ah bank. You’d charge this with a 24-volt battery charger
How to Wire Batteries in Series
- Check battery specs. Ensure all batteries have the same voltage, capacity and age
- Position batteries. Place them close together with terminals accessible
- Connect positive to negative. Run a cable from the positive terminal of battery 1 to the negative terminal of battery 2
- Repeat for additional batteries. Continue the chain: positive of battery 2 to negative of battery 3
- Connect to your system. The negative terminal of the first battery and positive terminal of the last battery are your output terminals

Advantages of Series Connections
- Higher voltage = lower current: A 360-watt device at 24V draws only 15 amps vs 30 amps at 12V
- Thinner wiring: Less current means you can use smaller gauge cables
- Less voltage drop: Lower current reduces losses over long cable runs
- Better for high-power systems: Solar charge controllers and inverters work more efficiently at higher voltages
Disadvantages of Series Connections
- No lower voltage access: You can’t tap 12V from a 24V series bank without a converter
- All equipment must match: Everything needs to run at the higher voltage
- Limited by weakest battery: One bad cell affects the entire string
How Many Batteries Can You Wire in Series?
Most manufacturers recommend a maximum of four 12V batteries in series (48 volts). Beyond 50 volts, the system becomes potentially dangerous and requires special safety precautions. Always check your battery manufacturer’s specifications.
When to Use Series Connections
- 24V or 48V systems: Golf carts, forklifts, some solar setups
- Higher voltage motors: Trolling motors, electric vehicles
- Large power systems: Anything over 3000 watts benefits from higher voltage
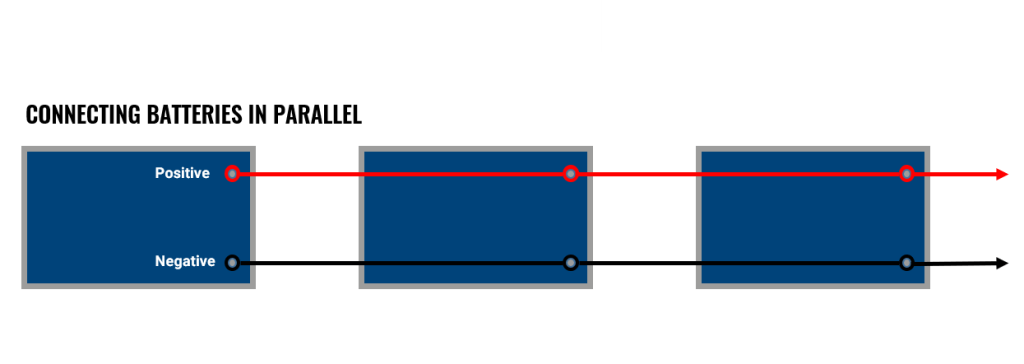
Battery Parallel Circuit Connection (Voltage Same, Capacity Up)
Connecting batteries in a parallel circuit increases total capacity while voltage stays the same. You’re linking batteries side-by-side with multiple current paths.
- How: Connect all positive (+) terminals together and all negative (-) terminals together
- Result: Voltage stays the same; total capacity (Ah) increases (sum of individual Ah)
- Example: Two 12V, 100Ah batteries in parallel make a 12V, 200Ah bank
How to Connect Batteries in Parallel
- Check requirements. Ensure all batteries have the same nominal voltage, capacity (Ah) and age
- Connect positives. Link the positive (+) terminal of the first battery to the positive (+) terminal of the second battery
- Connect negatives. Link the negative (-) terminal of the first battery to the negative (-) terminal of the second battery
- Connect to system. Connect the positive load cable to the first battery and the negative load cable to the last battery in the bank to ensure balanced discharging
- Use bus bars (optional). For more than two batteries, use positive and negative bus bars to connect all terminals for better balance
Advantages of Parallel Connections
- Increased capacity: Double your runtime with two batteries, triple it with three
- Redundancy: If one battery fails, the others can still provide power
- Standard voltage: Keeps your system at 12V for compatibility with most equipment
- Simpler wiring: No voltage conversion needed for standard 12V appliances
Disadvantages of Parallel Connections
- Higher current draw: Lower voltage means more amps for the same power
- Thicker cables required: More current needs heavier gauge wiring
- More voltage drop: Higher current increases losses over distance
- Longer charge times: More capacity takes longer to fully charge
How Many Batteries Can You Wire in Parallel?
There’s no hard limit on parallel connections. You can add as many batteries as you need for your capacity requirements. However, more batteries mean more connections, longer charge times and higher available fault current. Proper fusing becomes critical with large parallel banks to prevent catastrophic shorts.
When to Use Parallel Connections
- Longer runtime: More amp-hours means more time between charges
- 12V systems: RVs, boats, car audio where you need 12V but more capacity
- Backup power: UPS systems and emergency power banks
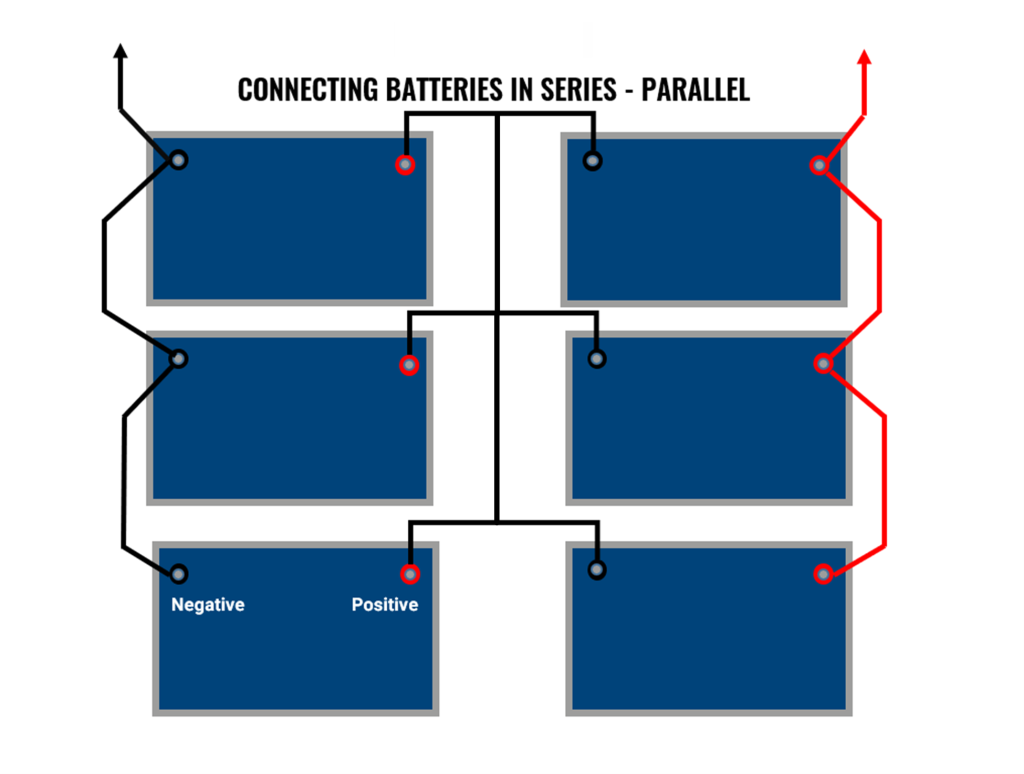
Series-Parallel Circuit Connection (Voltage and Capacity Up)
A parallel circuit and series circuit can be combined. This serial and parallel circuit configuration increases both voltage and capacity — the best of both worlds. Large battery banks for solar systems, RVs and off-grid setups use this parallel in series circuit design.
- How: Create parallel strings (e.g., two 12V batteries in parallel to get 12V, 200Ah) and then wire these strings in series
- Result: Both voltage and capacity increase
- Example: Two sets of 12V/100Ah parallel strings wired in series would create a 24V/200Ah system
How to Wire Batteries in Series-Parallel
- Build your parallel strings first. Connect batteries in parallel to create strings with your desired capacity
- Connect strings in series. Wire the positive of one string to the negative of the next string
- Balance your bank. Use identical batteries and equal-length cables throughout
- Connect to system. Take your final positive and negative from opposite corners of the bank for diagonal balancing
Common Series-Parallel Configurations
| Configuration | Batteries | Voltage | Capacity |
|---|---|---|---|
| 2S2P (4 batteries) | 4x 12V 100Ah | 24V | 200Ah |
| 3S2P (6 batteries) | 6x 12V 100Ah | 36V | 200Ah |
| 4S2P (8 batteries) | 8x 12V 100Ah | 48V | 200Ah |
| 2S4P (8 batteries) | 8x 12V 100Ah | 24V | 400Ah |
Charging Batteries in Series vs Parallel
The charging process works similarly for both configurations with a few key differences.
Charging Batteries in Series
For batteries wired in series, connect the positive charger cable to the positive terminal on the first battery in the series. Connect the negative charger cable to the negative terminal on the last battery in the series. The charger must match the total system voltage — use a 24V charger for two 12V batteries in series.
Series charging pushes current through all batteries equally. This works well when batteries are matched but can cause problems if one battery has lower capacity or is older than the others.
Charging Batteries in Parallel
For batteries wired in parallel, connect your charger similarly: positive to the first battery’s positive terminal and negative to the last battery’s negative terminal. This diagonal connection method ensures even charging across all batteries in the bank.
A 12V charger works for parallel 12V batteries regardless of how many you have connected. However, more batteries mean longer charge times. A 10-amp charger takes twice as long to charge 200Ah as it does 100Ah.
Multi-Bank Chargers
For faster charging of large battery banks, consider a multi-bank charger. These units charge each battery individually rather than the whole bank at once. This provides faster charge times and helps maintain balance between batteries.
Key Considerations for Battery Wiring
Matching Batteries
Always use batteries with the same voltage, capacity and age for best results. In series connections, the system is limited by the weakest battery. Mismatched batteries cause uneven charging and discharge, reducing lifespan.
Energy and Watt-Hours
Total energy (V x Ah = Wh) remains the same in both basic series and parallel setups if using the same number of batteries. Wiring changes how that energy is delivered: higher voltage/lower current vs lower voltage/higher current.
Cable Sizing
Series connections allow thinner cables because higher voltage means lower current for the same power. Parallel connections may require heavier cables to handle increased current capacity.
Safety
- Never mix old and new batteries in the same bank
- Use appropriate fuses on each battery or string
- Torque connections properly to prevent resistance and heat
- Check connections regularly for corrosion or loosening
Connecting Batteries: Series vs Parallel Quick Reference
| Factor | Series | Parallel | Series-Parallel |
|---|---|---|---|
| Voltage | Adds up | Stays same | Adds up |
| Capacity (Ah) | Stays same | Adds up | Adds up |
| Current handling | Same | Increases | Increases |
| Best for | Higher voltage needs | Longer runtime | Both |
| Wiring complexity | Simple | Simple | Moderate |
Series vs Parallel: Which Configuration Is Right For You?
Choosing between series and parallel depends on your specific application. Here’s how to decide.
Choose Series When:
- You need higher voltage. Golf carts, forklifts and large solar systems often run at 24V, 36V or 48V
- Running high-power equipment. Inverters over 3000 watts work more efficiently at higher voltages
- You want thinner cables. Higher voltage means lower current, allowing smaller gauge wiring
- Cable runs are long. Less current means less voltage drop over distance
Choose Parallel When:
- You need more runtime. Adding batteries in parallel increases capacity without changing voltage
- Your equipment runs on 12V. Most RV and marine equipment expects 12V input
- You want redundancy. If one battery fails, the others can still provide power
- Simplicity matters. No need for voltage converters or special equipment
Choose Series-Parallel When:
- You need both higher voltage AND more capacity. Large off-grid solar installations often use this approach
- Building a substantial battery bank. 8+ batteries usually benefit from series-parallel configuration
- Powering a whole house or large RV. Systems over 400Ah at higher voltages work best
Real-World Examples
Example 1: RV House Battery Upgrade
A typical RV runs on 12V and the owner wants longer runtime for boondocking. They have two 12V 100Ah batteries.
Best choice: Parallel connection gives 12V at 200Ah — double the runtime without changing any existing wiring or equipment.
Example 2: Golf Cart Battery Replacement
Golf carts typically run on 36V or 48V systems. Using 12V batteries:
For 36V: Three 12V batteries in series (12V + 12V + 12V = 36V) For 48V: Four 12V batteries in series (12V + 12V + 12V + 12V = 48V)
Example 3: Off-Grid Solar System
A cabin needs 24V for efficient inverter operation and 400Ah capacity for multiple days of autonomy.
Best choice: Series-parallel with four 12V 200Ah batteries. Wire two batteries in series for 24V, then connect both series strings in parallel for 24V 400Ah.
Troubleshooting Battery Banks
One Battery Drains Faster
This indicates mismatched batteries or a bad cell. Test each battery individually with a battery tester. Replace any battery that doesn’t match the others. In a series bank, one weak battery limits the entire system.
Bank Won’t Hold Charge
Check all connections for corrosion or looseness. A single bad connection creates resistance that affects the entire bank. Clean terminals with a wire brush, apply dielectric grease and retorque all connections to manufacturer specs.
Batteries Getting Hot
Overheating usually means a short circuit, overcharging or severely mismatched batteries. Disconnect immediately and identify the problem before reconnecting. Check for:
- Damaged insulation allowing wire-to-wire contact
- Charger voltage set too high
- One battery with significantly different internal resistance
- Loose connections creating heat from resistance
Uneven Charging in Parallel Banks
If batteries in a parallel bank charge unevenly, the connections may have different resistances. Use equal-length cables from each battery to the bus bars. Check that all connections are equally tight and corrosion-free.
Voltage Imbalance in Series Banks
Series-connected batteries should show equal voltage when measured individually. If one battery reads significantly higher or lower than the others, it may be failing or have a different state of charge. Balance the bank by charging each battery individually before reconnecting.
Common Applications for Battery Banks
RVs and Campers
Most RVs run 12V systems for lights, water pumps, fans and charging devices. A typical setup uses two to four batteries wired in parallel for 12V with 200-400Ah capacity. This provides enough power for a weekend of boondocking without hookups.
Larger RVs with residential refrigerators, air conditioners or induction cooktops often upgrade to 24V or 48V systems with lithium batteries. The higher voltage allows more efficient inverter operation for these high-draw appliances.
Marine and Boat Systems
Boats typically separate starting batteries from house batteries. The starting battery remains isolated to ensure engine cranking. House batteries wired in parallel provide power for electronics, lights, refrigeration and accessories.
Trolling motors often require 24V or 36V, achieved by wiring 12V batteries in series. A 24V trolling motor needs two 12V batteries in series. A 36V motor needs three.
Solar Power Systems
Off-grid solar installations commonly use battery banks at 24V or 48V. Higher voltage reduces current flow through the charge controller and inverter, improving efficiency. A typical cabin system might use eight 12V batteries in a 4S2P configuration for 48V and 200Ah.
Grid-tied solar with battery backup often uses pre-built lithium battery systems at 48V. These stack together for increased capacity while maintaining the same voltage.
Golf Carts and Electric Vehicles
Golf carts run on 36V or 48V systems. Traditional lead-acid setups use six 6V batteries in series for 36V or six 8V batteries for 48V. Many owners now upgrade to lithium by using four 12V batteries in series.
Electric UTVs, ATVs and neighborhood electric vehicles use similar series configurations at higher voltages for better motor efficiency and range.
Backup Power and UPS Systems
Home backup power systems range from small 12V setups for essential loads to whole-house systems at 48V. Critical load panels typically need 3000-6000 watts of inverter capacity, making 24V or 48V configurations more practical than 12V.
Commercial UPS systems often use large battery banks in series-parallel configurations. Data centers might have dozens of batteries providing both the voltage and capacity needed for extended runtime during outages.
Battery Types and Their Wiring Considerations
Lead-Acid Batteries
Flooded lead-acid batteries require regular maintenance including water level checks and equalization charging. When wired in series, all batteries must be equalized together. Parallel banks may need individual equalization if one battery shows signs of sulfation.
AGM (Absorbed Glass Mat) and gel batteries are sealed and maintenance-free. They work well in series and parallel configurations but are sensitive to overcharging. Use a charger specifically designed for AGM or gel chemistry.
Lithium Iron Phosphate (LiFePO4)
Lithium batteries have built-in Battery Management Systems (BMS) that monitor cell voltage, temperature and current. When wiring lithium batteries in series, each battery’s BMS operates independently. This can cause issues if one battery’s BMS triggers a disconnect while others continue operating.
Many lithium battery manufacturers recommend specific series and parallel limits. Some batteries communicate between units for better bank management. Always follow the manufacturer’s guidelines for your specific batteries.
Mixing Battery Types
Never mix different battery chemistries in the same bank. Lead-acid and lithium have different charging profiles, voltages and discharge characteristics. Mixing them causes damage to one or both battery types.
Even within the same chemistry, avoid mixing batteries of different ages, capacities or brands. The weakest battery limits the entire system and degrades faster when paired with stronger batteries.
Tools and Supplies for Battery Wiring
Building a battery bank requires proper tools and materials:
- Battery cables: Use appropriately sized cables for your current. 4 AWG handles about 100 amps, 2 AWG handles 150 amps, 1/0 handles 200 amps
- Battery terminals: Ring terminals, flag terminals or bus bars depending on your configuration
- Crimping tool: A hydraulic crimper makes secure connections on large gauge cables
- Heat shrink: Seal and insulate all connections
- Torque wrench: Many battery terminals require specific torque values
- Fuses or breakers: Protect each battery or string with appropriate overcurrent protection
- Battery monitor: Track voltage, current and state of charge
Related Guides
- Trolling Motor Battery Guide - 12V, 24V and 36V trolling motor setups
- Golf Cart Battery Charger Guide - 36V and 48V golf cart systems
- Off-Grid Solar Battery Guide - Solar battery bank sizing and wiring
- AGM Battery Charger Guide - Charging sealed lead acid batteries
- Battery Tester Guide - Testing battery health and capacity
- Trailer Wiring Diagram Guide - 12V trailer electrical systems