5-Pin Trailer Wiring: Pinout, Colors and Surge Brake Setup
The 5-pin trailer connector uses white (ground), brown (running lights), yellow (left turn/brake), green (right turn/brake) and blue (electric brakes or reverse). A 4-pin wiring diagram uses the same first four wires without the blue. Installation takes 30-60 minutes and adapters from 4-pin to 7-pin cost $15-30 at any auto parts store. Use 5-pin for trailers with surge brakes or backup lights. For detailed wiring diagrams of all connector types, check our complete trailer wiring diagram guide.
5-Pin Connector Overview
Understanding when and why to use 5-pin connections.
When 5-Pin Is Used
5-pin connectors appear on:
- Trailers with surge brakes (hydraulic)
- Trailers needing backup lights
- Some boat trailers
- Utility trailers with electric brakes
- Equipment trailers with auxiliary circuits
5-Pin vs 4-Pin
| Feature | 4-Pin | 5-Pin |
|---|---|---|
| Running lights | ✓ | ✓ |
| Turn signals | ✓ | ✓ |
| Brake lights | ✓ | ✓ |
| Ground | ✓ | ✓ |
| Fifth circuit | ✗ | ✓ |
The fifth wire handles electric brakes, reverse lights or auxiliary power. If you need all three functions, check our 7-pin trailer connector guide.
5-Pin vs 7-Pin
5-pin is simpler than 7-pin:
- No battery charging circuit
- No separate accessory power
- Often flat style, fits smaller vehicles
- Adequate for lighter trailers
Choose 7-pin for:
- Trailers with batteries
- Heavy equipment needing electric brakes
- Enclosed trailers with interior lights
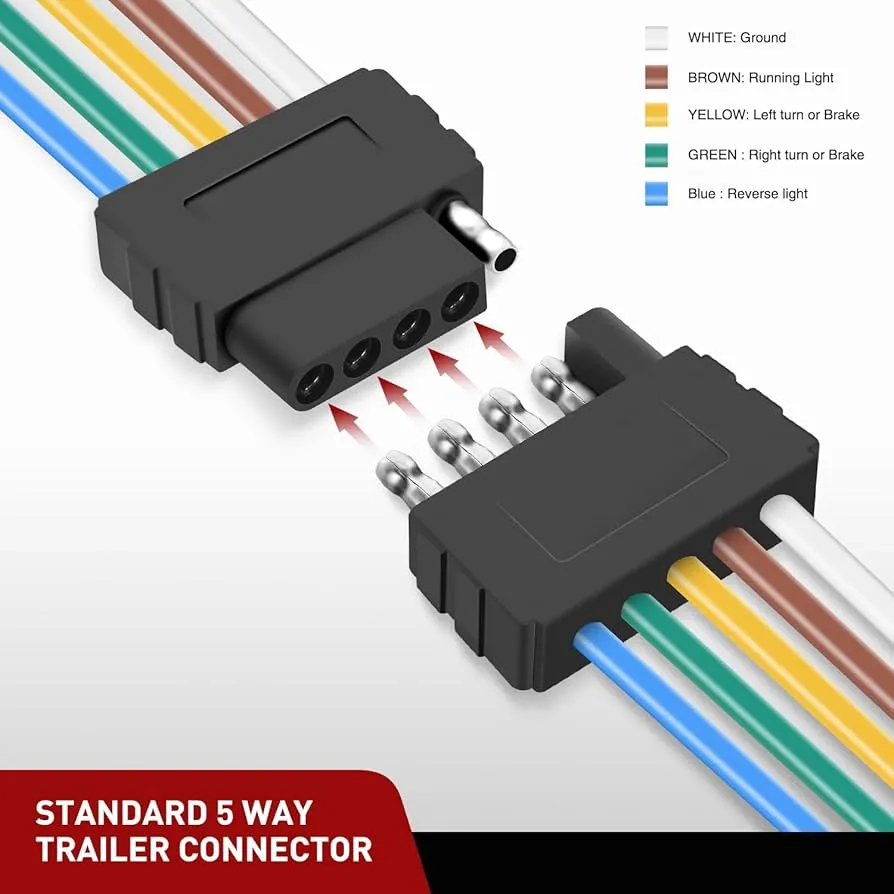
Wiring Colors and Functions
Standard flat connector wiring.
Pin Layout
Looking at the connector:
┌─────────────────────┐
│ ● ● ● ● │ ← 4 standard pins
│ ● │ ← 5th pin (center below)
└─────────────────────┘
Wire Functions
| Wire Color | Function |
|---|---|
| White | Ground |
| Brown | Tail/running lights |
| Yellow | Left turn/brake |
| Green | Right turn/brake |
| Blue | Electric brakes OR reverse |
Fifth Wire Applications
For Electric Brakes:
- Blue wire carries brake signal
- Connects to brake magnets
- Requires brake controller in vehicle
- Use a circuit tester to verify connections
For Reverse Lights:
- Blue wire carries reverse signal
- Illuminates when vehicle in reverse
- No controller needed
For Auxiliary Power:
- Less common use
- Provides 12V for accessories
- May be fused separately
How to Install a 5-Pin Trailer Connector
Installing 5-pin connectors on vehicle and trailer.
Vehicle Side Installation
If upgrading from 4-pin:
- Locate existing connector or taillight wiring
- Add fifth wire:
- For brakes: Run from brake controller to connector
- For reverse: Splice into reverse light circuit
- Replace connector with 5-pin type
- Mount securely at bumper/hitch area
- Test all functions before road use
New installation:
- Choose wiring method:
- Vehicle-specific harness (plug-in)
- Universal kit (splice connections)
- Route wiring to rear of vehicle
- Connect to each circuit:
- Brown to running light circuit
- Yellow to left turn/brake
- Green to right turn/brake
- Blue to brake controller or reverse
- White to chassis ground
- Mount connector bracket
- Test thoroughly
Trailer Side Installation
- Plan wire routing through frame or conduit
- Run wires from tongue to each light
- Connect at each light:
- Brown to running light wire
- Yellow to left side turn/brake
- Green to right side turn/brake
- Blue to brake or reverse as needed
- Establish ground:
- White wire to clean frame metal
- Star washer under bolt
- Dielectric grease on connection
- Mount connector at tongue with service loop
- Test all functions
Wiring Tips
- Use automotive-grade wire (not household) - see our wiring harness guide for wire selection
- Protect all connections from moisture
- Leave service loop for connector movement
- Support wires to prevent chafing
- Use heat shrink on all splices
Adapters
When connections don’t match.
Common Adapter Situations
| Vehicle Has | Trailer Has | Adapter Needed |
|---|---|---|
| 4-pin flat | 5-pin flat | 4 to 5-pin adapter |
| 5-pin flat | 4-pin flat | 5 to 4-pin adapter |
| 7-way blade | 5-pin flat | 7 to 5-pin adapter |
| 5-pin flat | 7-way blade | 5 to 7-pin adapter |
Adapter Limitations
4 to 5-pin adapter:
- No brake or reverse function available
- Only provides basic lighting
- Okay if trailer brakes aren’t needed
5 to 7-pin adapter:
- Only provides what 5-pin has
- No battery charging circuit
- No additional accessory power
When to Rewire Instead
Better to rewire when:
- Adapter connections corrode frequently
- Need full functionality of higher-pin connector
- Professional appearance matters
- Long-term or frequent use
Troubleshooting Common Problems
No Functions Work
Check in order:
- Vehicle fuse for trailer circuit
- Connector fully seated
- Ground connection at both ends
- Pin corrosion in connector
Lights Work But Brakes Don’t
For electric brake circuit:
- Brake controller power and ground
- Blue wire continuity to trailer
- Breakaway switch position
- Brake magnet resistance
For reverse light circuit:
- Vehicle reverse lights working
- Blue wire connection to reverse circuit
- Trailer reverse light bulbs
One Side Not Working
- Check ground at that side’s lights
- Test bulb
- Check wire continuity to that side
- Look for damaged wiring
Intermittent Problems
Usually connection issues:
- Clean all connector pins
- Check for loose crimps
- Inspect wire for breaks
- Verify solid ground connections
Fifth Circuit Works But Lights Don’t
- Separate circuits - lights can fail independently
- Check brown wire for running lights
- Test yellow/green for turn/brake
- Verify ground is good
Maintenance Tips
Keep connections reliable.
Regular Checks
Before each trip:
- Connect and test all five circuits
- Look for visible damage
- Ensure solid mechanical connection
- Test brakes if equipped
Cleaning Procedure
- Disconnect trailer
- Spray electrical cleaner in connector
- Use small brush for stubborn corrosion
- Apply dielectric grease to pins
- Reconnect and test
Corrosion Prevention
- Use connector cap when not towing
- Apply dielectric grease regularly
- Store connector elevated (out of puddles)
- Replace cracked housings immediately
Annual Maintenance
- Full visual inspection of all wiring
- Test each circuit with meter
- Check ground resistance
- Verify brake magnet function (if equipped)
Frequently Asked Questions
Is 5-pin the same as 5-way flat?
Yes, “5-pin” and “5-way flat” refer to the same connector style. It’s the standard flat trailer connector with five pins instead of four.
Can I use a 4-pin connector on a 5-pin trailer?
Yes, but you lose the fifth function (brakes or reverse). This is okay for short trips without trailer brakes, but not recommended for regular use if the trailer has brakes.
Why does my fifth pin function not work?
Common causes: no brake controller installed (for brake function), vehicle reverse circuit not connected (for reverse lights), blown fuse or damaged blue wire.
Do I need a brake controller for 5-pin?
Only if the fifth wire is for electric brakes. If it’s for reverse lights, no controller needed - just a connection to your vehicle’s reverse light circuit.
Can I convert 5-pin to 7-pin for more features?
Yes. You’d add wiring for battery charge (red) and accessory (black) circuits. This requires additional wiring to your vehicle but provides full functionality.
Summary
The 5-pin trailer connector bridges the gap between basic 4-pin lighting and full 7-pin capability. It’s perfect for utility trailers needing electric brakes or reverse lights without the complexity of seven wires. Proper installation with good grounds and weather protection ensures years of reliable service. Test all five functions before every trip.